Set up/change email account
Use this form to add a new email account to the app or edit an existing one. This form collects both the settings for retrieving emails (IMAP) and the settings for sending emails (SMTP).
You generally receive this information from your email service provider.
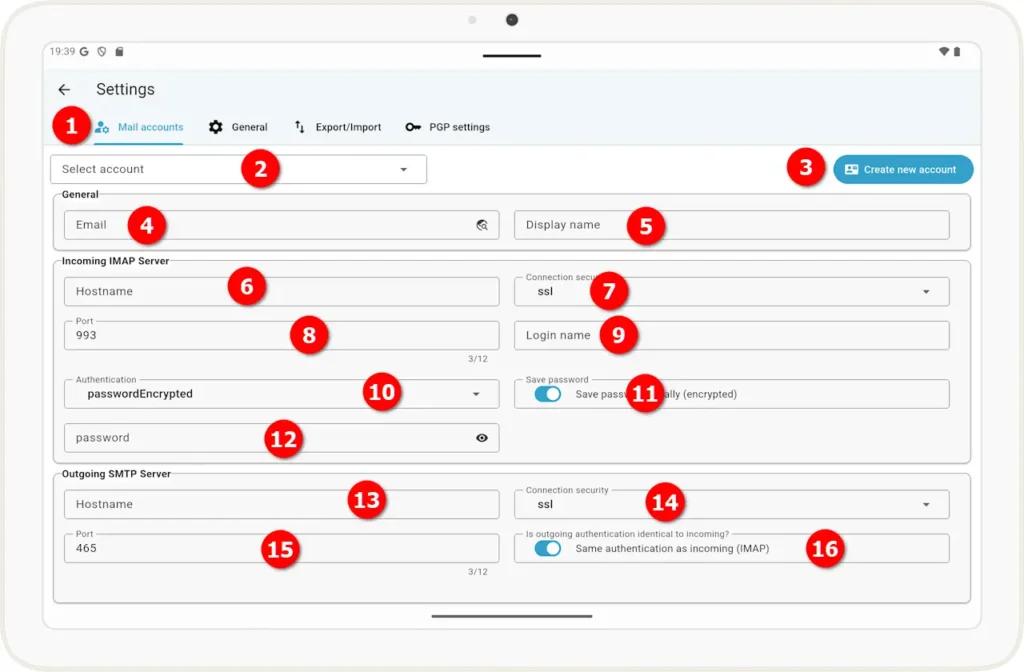
General Mailbox Settings
1 Select the “Email Account” tab in the Settings dialog (default view when opening Settings)
2 Select the settings for an account that has already been set up.
3 If the fields are already filled in (by default, the currently open account is preselected), you can use this button to clear them, for example, to set up a new account.
4 The email address used as the sender when sending emails from this account.
Note: There is an icon ( ) in this field. When you tap it, the app will attempt to automatically detect the settings based on the email address you entered. If this fails, you will need to use the information provided by your email provider.
5 The name displayed for the email address (may be blank).
Settings for the Inbox and Mailboxes (IMAP)
6 The hostname of the provider server used to query the mailboxes.
7 The security layer of the data transfer protocol required by the IMAP provider.
8 The port that the provider expects for the IMAP connection.
9 The login name you use to authenticate yourself with the provider. In many cases, this is the same as your email address.
10 The security layer used to transmit the password.
(For oauth2 please look at FAQ)
11 Use this toggle to choose whether to save the password (encrypted) in the app, or to be prompted for the password every time you open the email account.
12 Use this password to authenticate with the provider.
Note: You can make the text visible by clicking the icon button ( ).
).
Settings for sending emails (SMTP)
13 The hostname of the server used to send emails (SMTP). Often the same as (6)
14 The security layer of the data transmission protocol required by the email provider for the SMTP connection.
15 The port required by the provider for the SMTP connection.
16 If the login name, password, and security layer for password transmission are the same as the IMAP settings, you can leave this switch set to ON. If you set it to OFF, the fields listed for the SMTP outbox will be displayed separately, and you can enter them there.
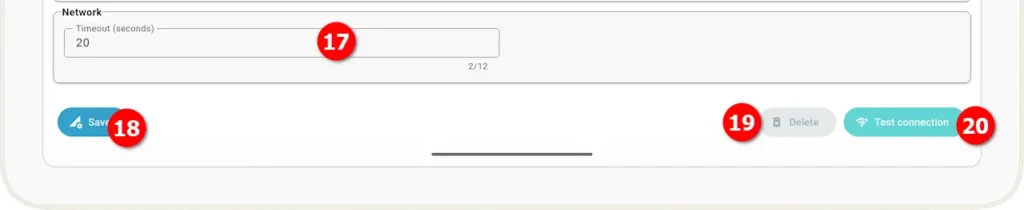
17 This setting determines how long the app waits for a network response from the email server (in seconds). If you frequently receive timeout error messages, you should increase this value. This may be due to a slow network connection or a heavily loaded email server.
Call-to-action buttons
18 Once you have entered the required data, you must save it; otherwise, it will be lost when you exit the settings.
19 Use this button to permanently delete the currently selected email account (only in the app; this does not affect your email provider, of course).
20 Click this button to initiate a test connection using the entered data.